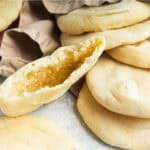
Mini Pita Bread Rounds
Mini Pita Bread Rounds offers a fun and versatile twist on the classic flatbread. These adorable little pockets are perfect for appetizers, snacks, or as a base for creative dishes.
Servings: 15 pieces
Calories: 117kcal
Equipment
- Large Rimmed Cookie sheet with cooling racks
Ingredients
- 3 ¼ cup all-purpose flour
- 2 ¼ teaspoon active dry yeast
- 1 teaspoon salt
- 2 tablespoon olive oil
- 1 ¼ cup water lukewarm
Instructions
- In a large bowl, combine warm water (no more than 110°F) with ¼ cup. Stir to dissolve. Sprinkle the yeast on top and set aside for about 10 minutes until foamy.
- Add the remaining flour, salt, and olive oil. Stir until everything comes together in a sticky dough.
- Turn out on a floured surface and knead for 7-10 minutes until smooth and soft. If the dough is still sticking to your hands more than itself, add a bit more flour a tablespoon at a time.
- Place dough into a greased bowl and cover with plastic wrap or a damp cloth. Place in a warm location and allow to rise until 2.5-3x the size, about 1 hour depending on the ambient temperature.
- Preheat oven to 475°F. Place a heavy baking sheet in the oven to heat as well.
- Turn dough out on to lightly floured surface and cut into 15 equal pieces.
- With each piece, fold the edges into the center and roll between your palms to form a ball. Set aside to rest for 5-7 minutes covered with a cloth so the gluten relaxes.
- On a well-floured surface, use a rolling pin to roll each piece into a 5 inch circle slightly more than ¼” thick. Rest the formed pitas for 15 minutes.
- Bake 3-5 pitas at a time by placing them on the preheated baking sheet. Bake for 2-3 minutes until well puffed (but not turning brown). Remove immediately and place a new batch in the oven. Once removed from the oven the pitas will collapse, but will still have the pocket inside when cut open.
- Serve immediately or store in an airtight container in the fridge for up to 3 days.
Notes
- Activate Your Yeast Properly: Ensure your water is the right temperature (around 105-115°F or 40-46°C) to properly activate the yeast. If your yeast doesn't foam, it's likely dead, and your dough won't rise.
- Don't Over-Flour: Add flour gradually and stop when the dough is still slightly tacky but manageable. Too much flour will result in dry, tough pitas that won't puff well.
- Allow for Sufficient Rise Time: Let the dough rise in a warm, draft-free place until it has doubled in size. This can vary based on room temperature, so be patient. A good rise ensures light, airy pitas.
- Roll Evenly and Consistently: When rolling out your dough balls, aim for an even thickness (about ¼ inch). Inconsistent thickness can lead to uneven puffing, with some parts crisping while others remain soft.
- Preheat Your Baking Surface Thoroughly: Whether using a cast-iron skillet, a baking stone, or a baking sheet, ensure it's screaming hot before you place the pitas on it. High, immediate heat is crucial for the "pocket" to form and for the pitas to puff up.
Nutrition
Calories: 117kcal | Carbohydrates: 21g | Protein: 3g | Fat: 2g | Saturated Fat: 0.3g | Polyunsaturated Fat: 0.3g | Monounsaturated Fat: 1g | Sodium: 157mg | Potassium: 33mg | Fiber: 1g | Sugar: 0.1g | Vitamin C: 0.001mg | Calcium: 5mg | Iron: 1mg
